
What This Is
I had a perfectly fine desktop sitting on the floor in a Jonsbo D41. It had that little attached screen which was pretty neat, though it seems like they stopped selling that version. The build worked. It was just… big. After watching enough SFF content online, I got tired of having a tower eating floor space and decided to shrink everything down.
The case itself is a budget-friendly compact micro-ATX design by Makerunit on Printables. It’s designed to fit a full micro-ATX board and a standard ATX power supply into way less space than you’d expect. Most of the case is black PETG, and the front removable panel is silver and grey-blue PLA. Printed mostly on the P2S, though some parts came off the A1.
The Parts List
Here’s what actually went inside, not some made-up specs:
- ASRock B660M RS Pro Intel motherboard
- Intel i5-12600KF
- 64GB DDR4 3600MHz
- Thermalright low profile cooler
- be quiet! 550W ATX PSU
- 1TB ORICO PCIe Gen4 SSD (sold out now, this one is the next best thing)
- Crucial MX500 1TB SATA SSD (way overpriced at the moment, this alternative is better value right now)
- RTX 3060 12GB from the old build
The Migration
Before
This was the starting point. The Jonsbo D41 isnt a bad case at all, especially with that little screen. But it lived on the floor, and I was tired of that. The plan was simple: move everything into something that could actually sit on top of the desk without looking ridiculous.
Motherboard Test Fit
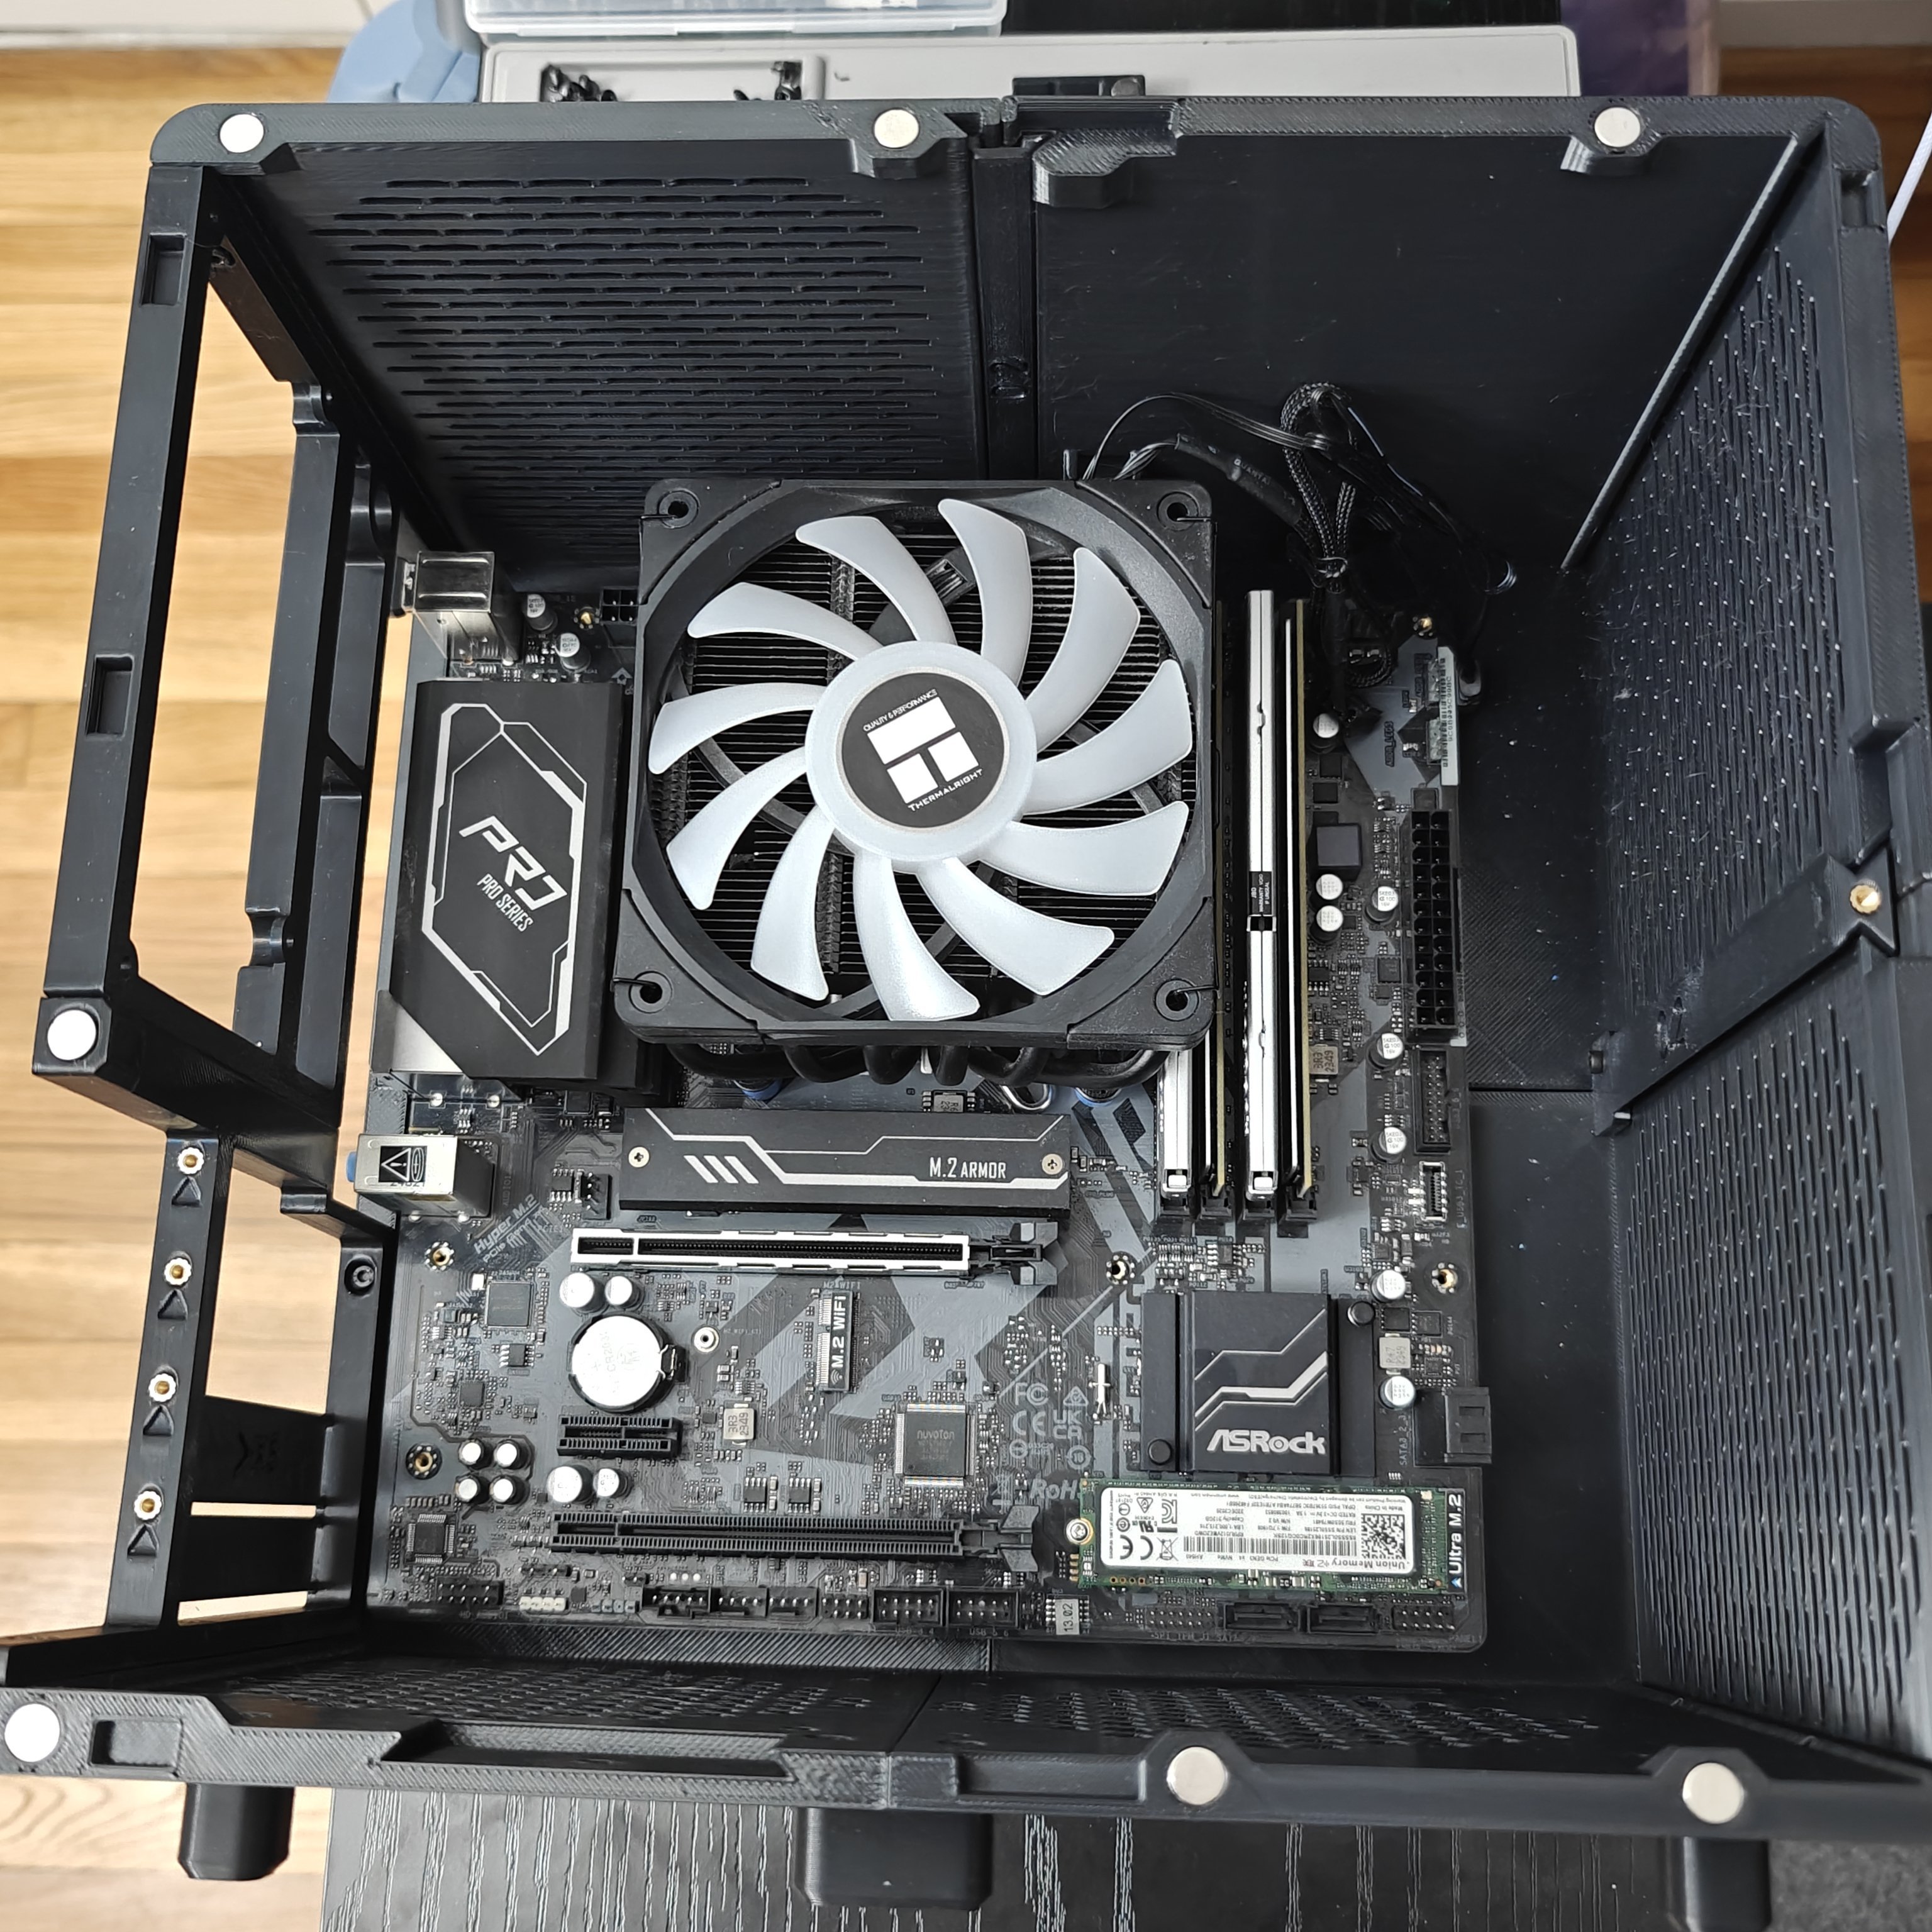
First panels off the printer went straight into a test fit. The B660M drops in cleanly, standoff holes line up, and the Thermalright cooler clears the top panel with just enough room. So far so good.
Side View
You can see the vertical layout here. The PSU exhaust fan sits at the top, pulling air up and out. CPU cooler is dead center, RAM slots are accessible, M.2 is exposed. What you cant see yet is how the GPU and PSU will share this space, or where the cables are supposed to go. Still optimistic at this point.
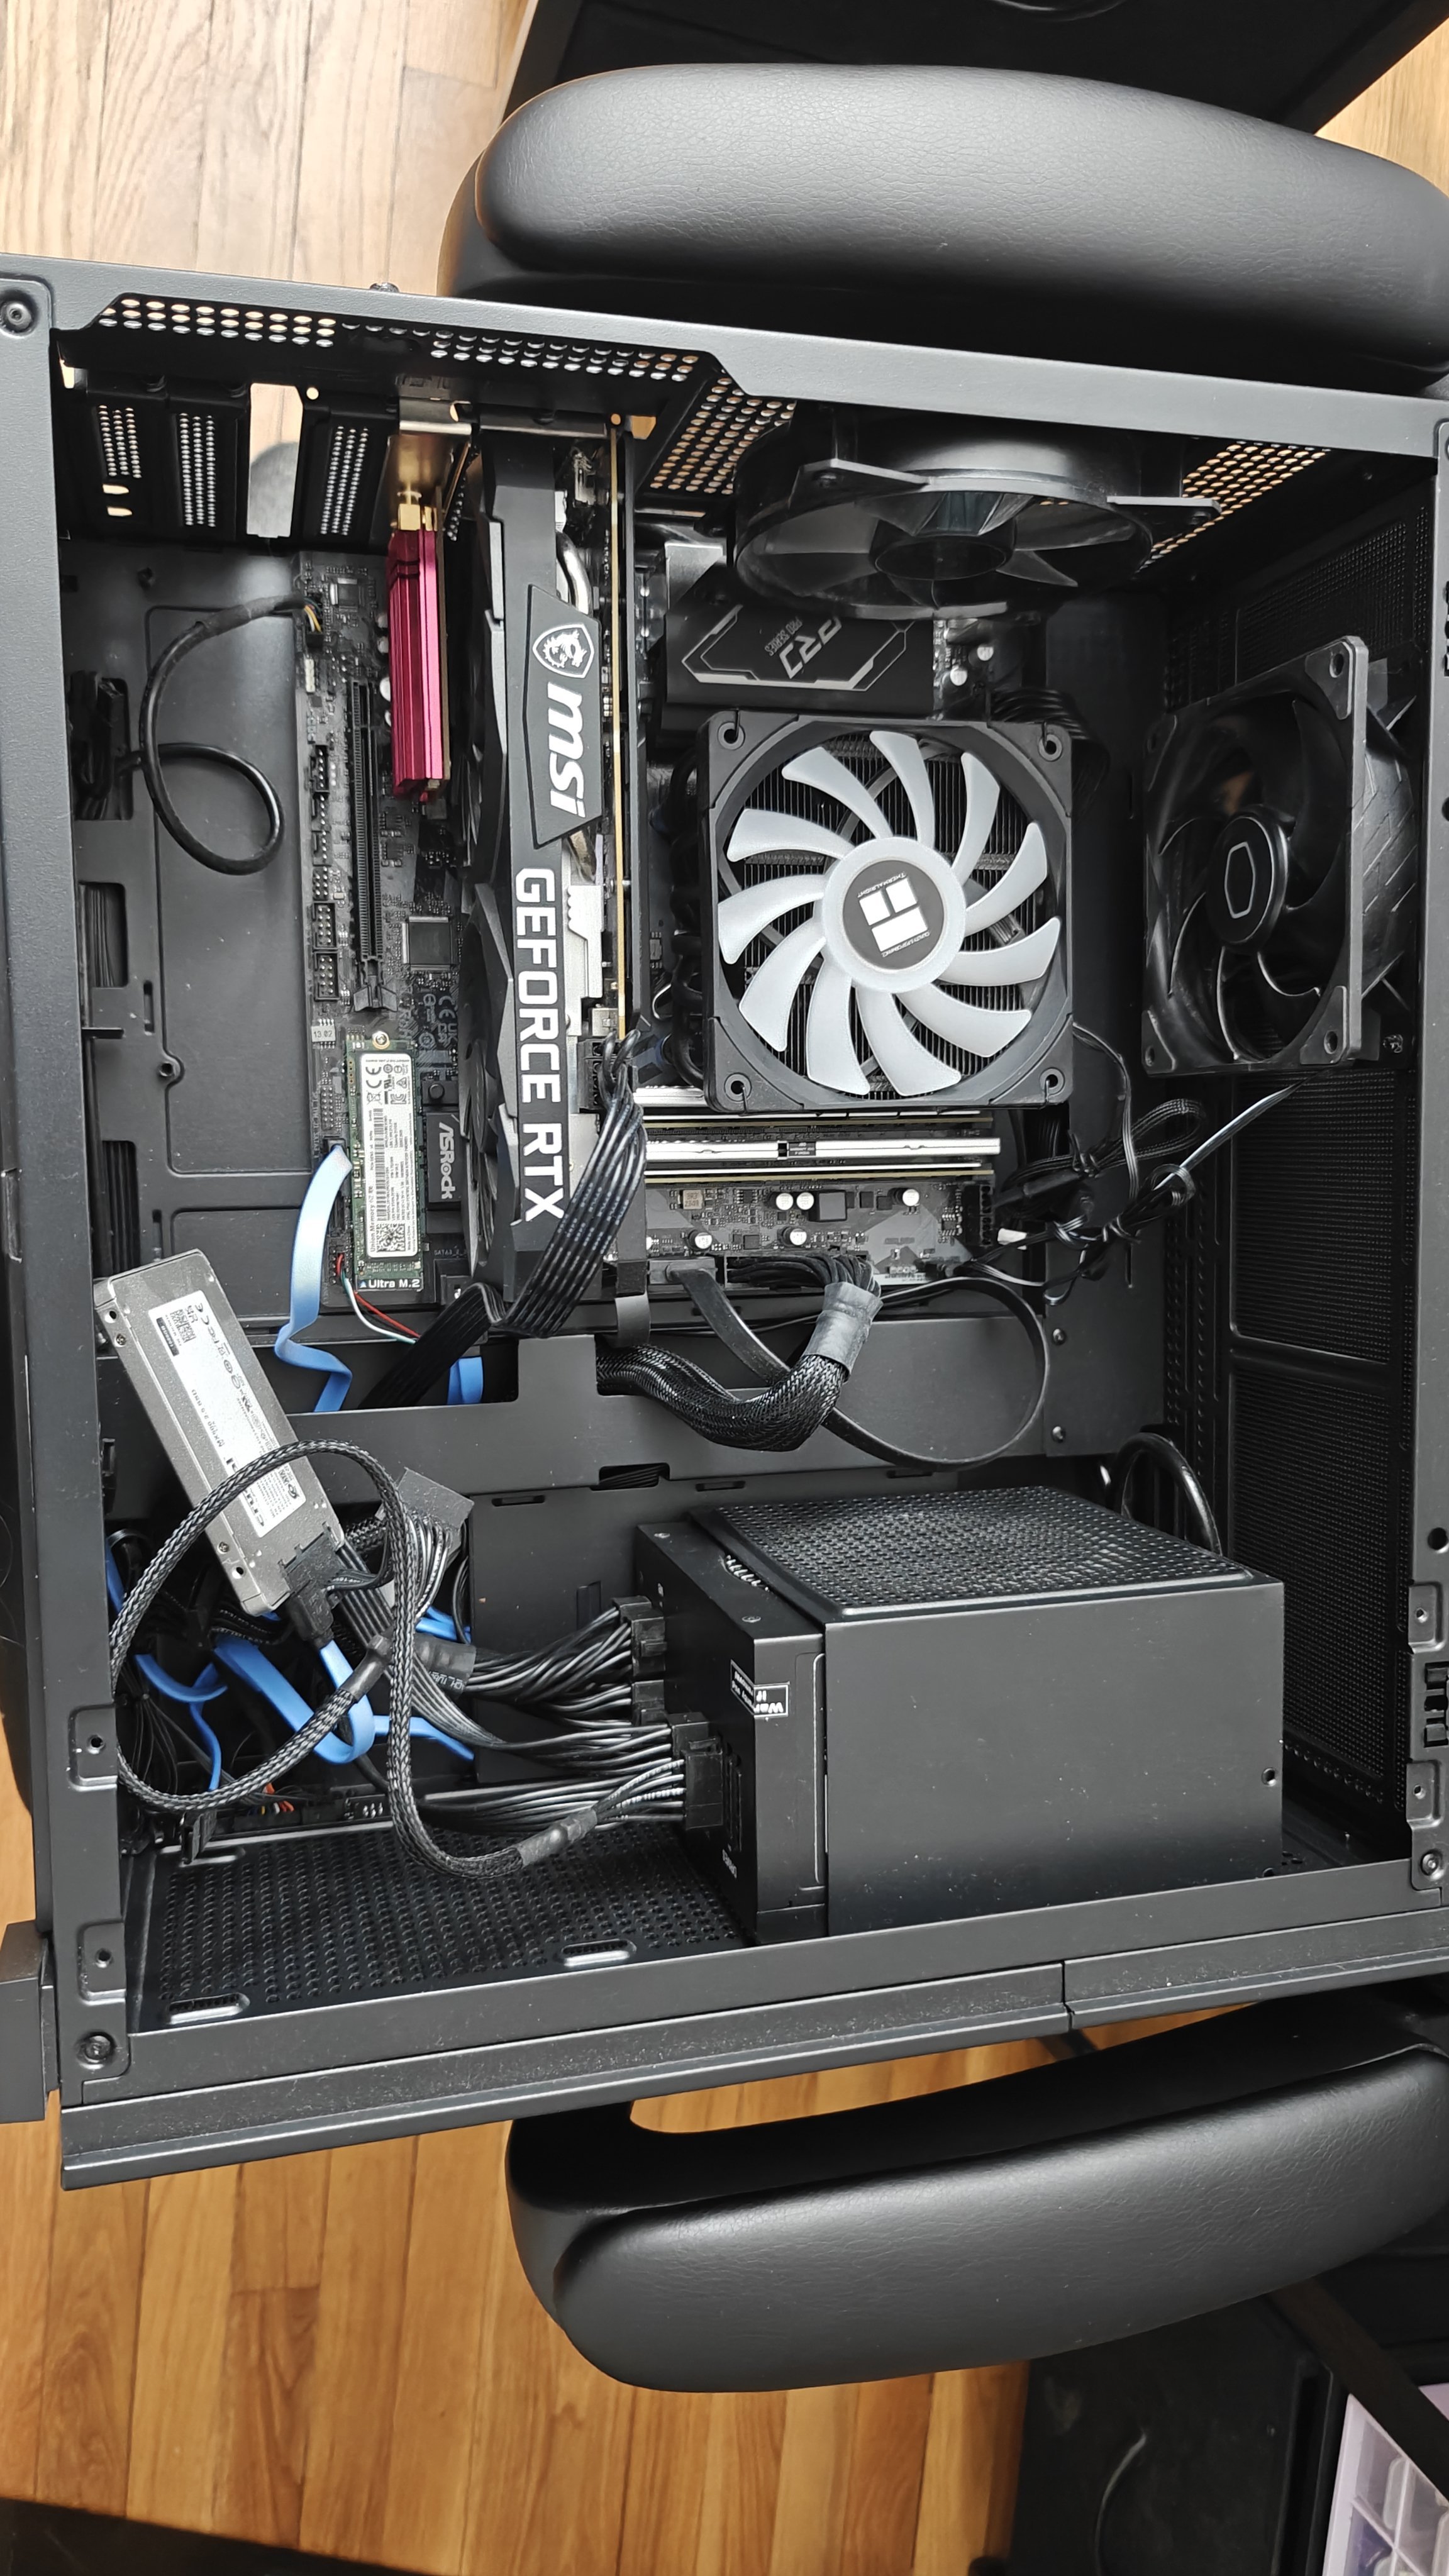
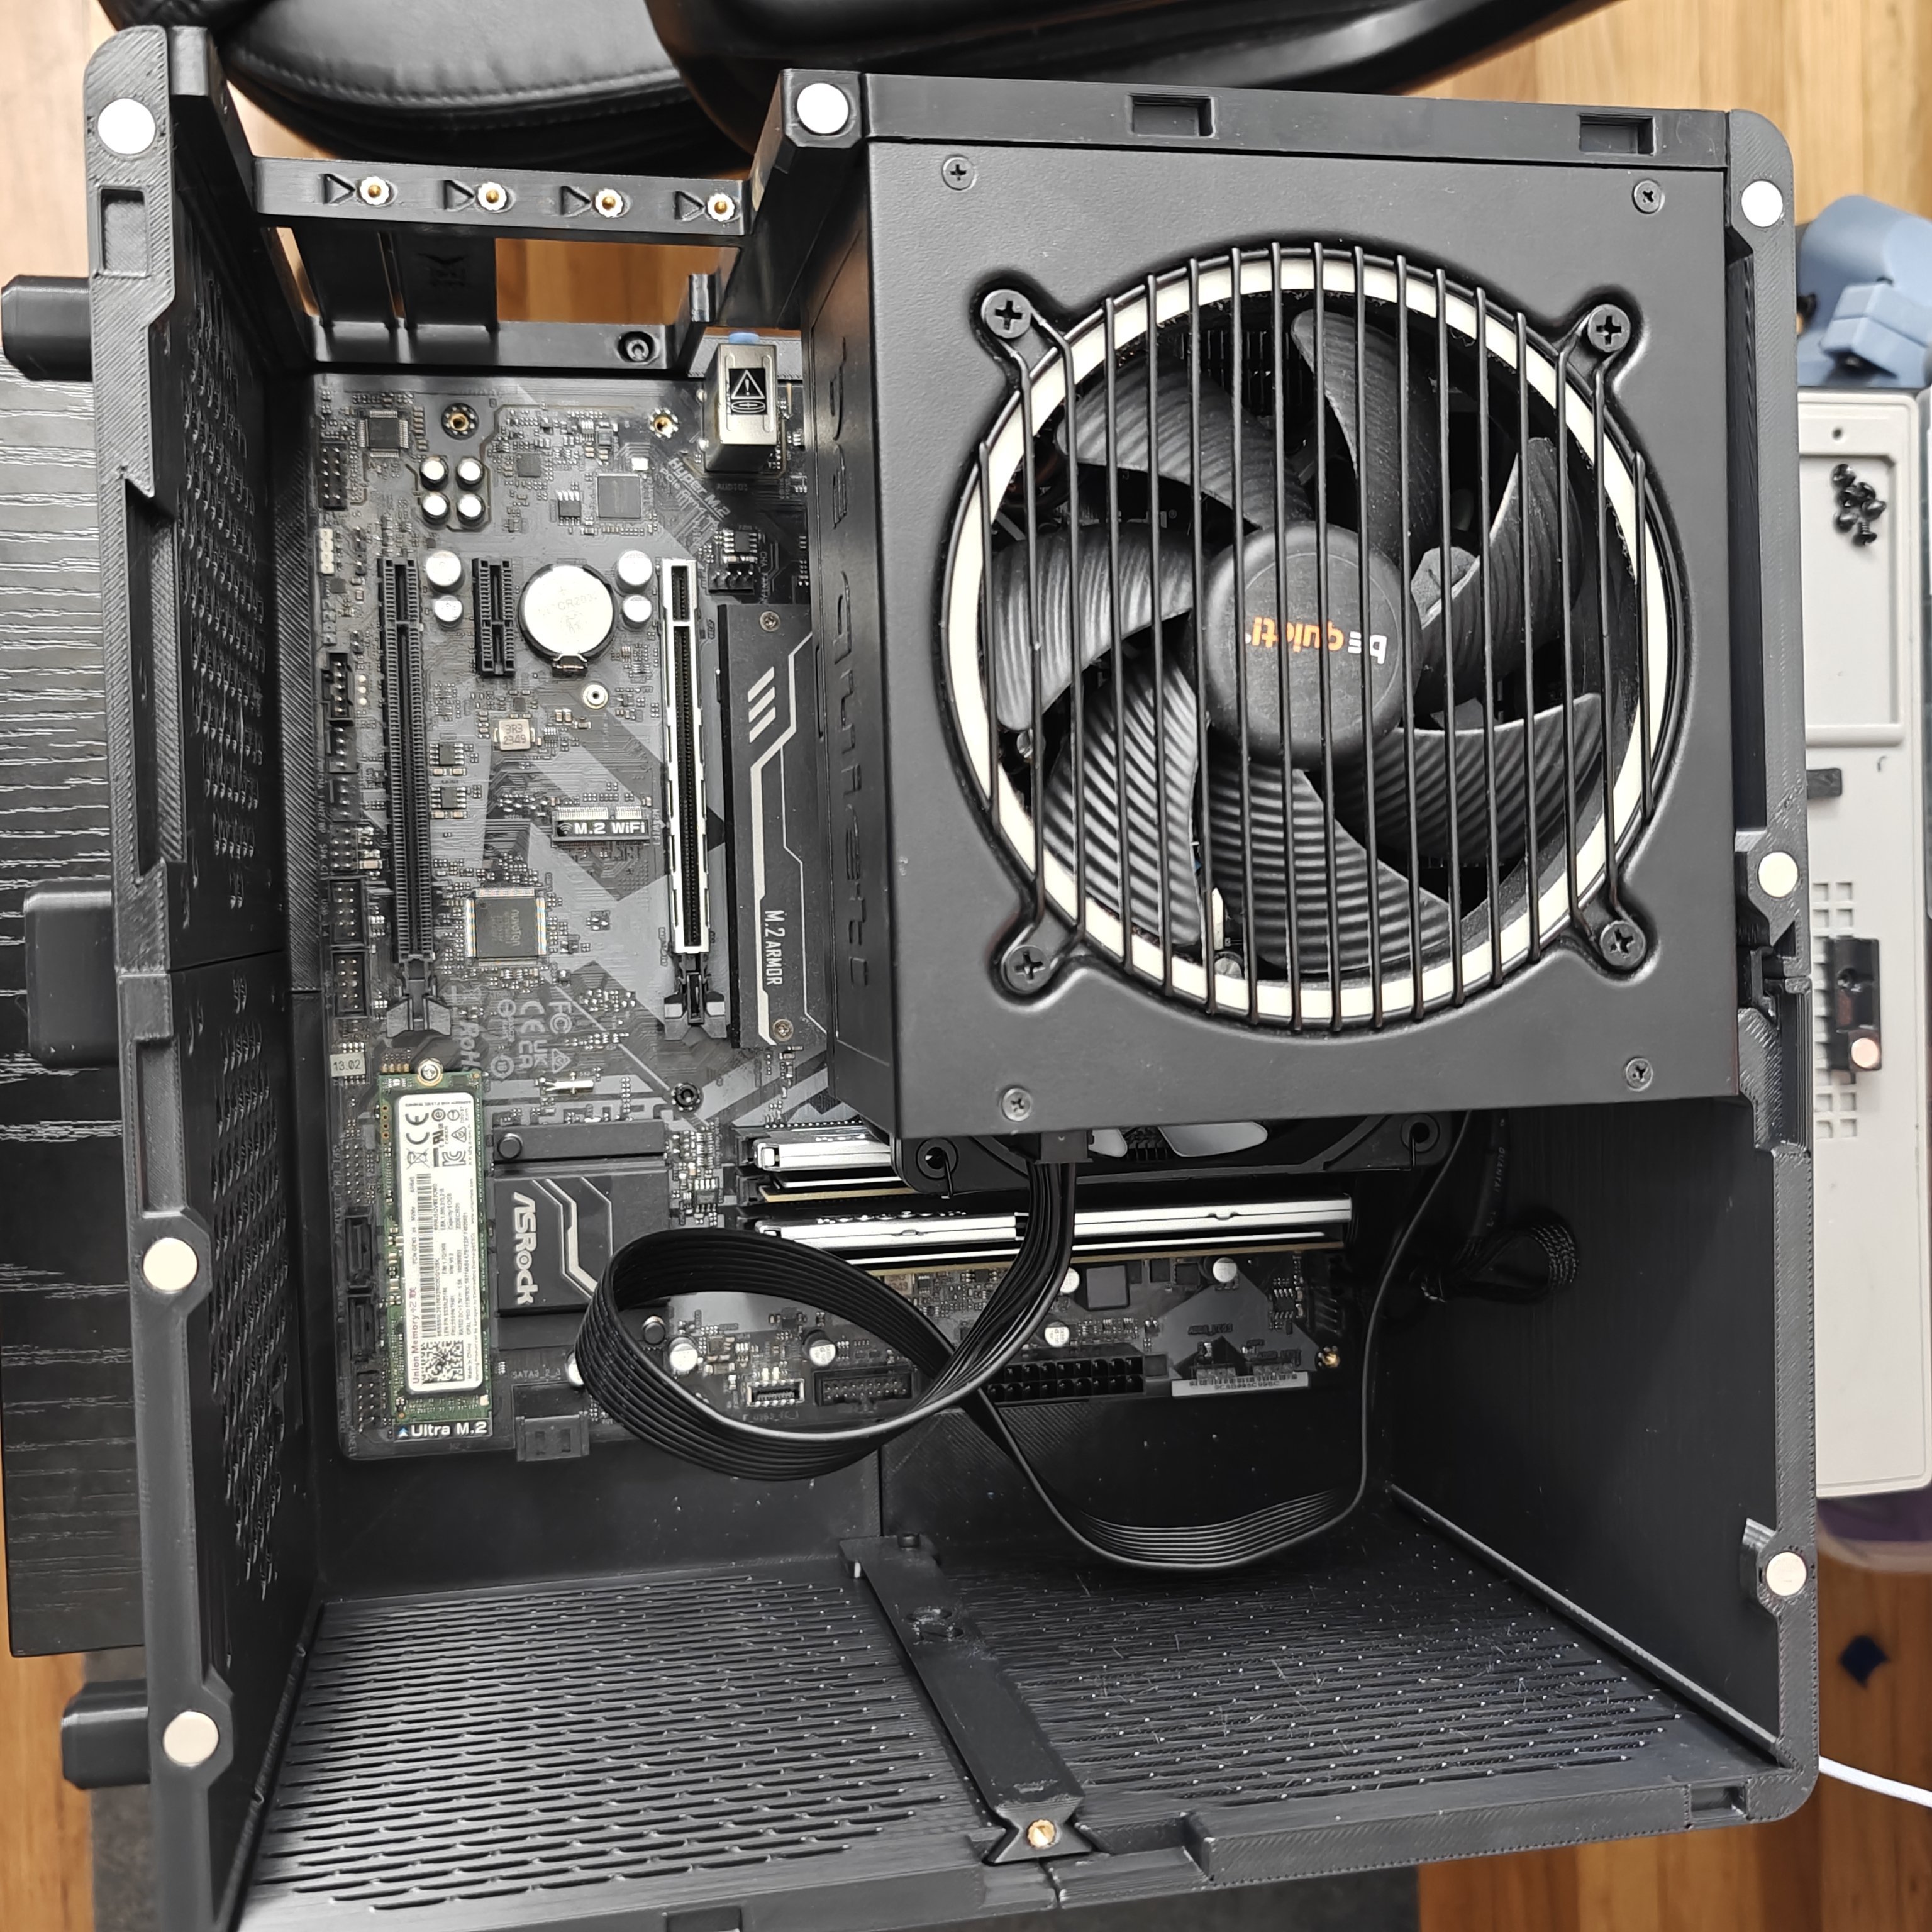
GPU and PSU Installed
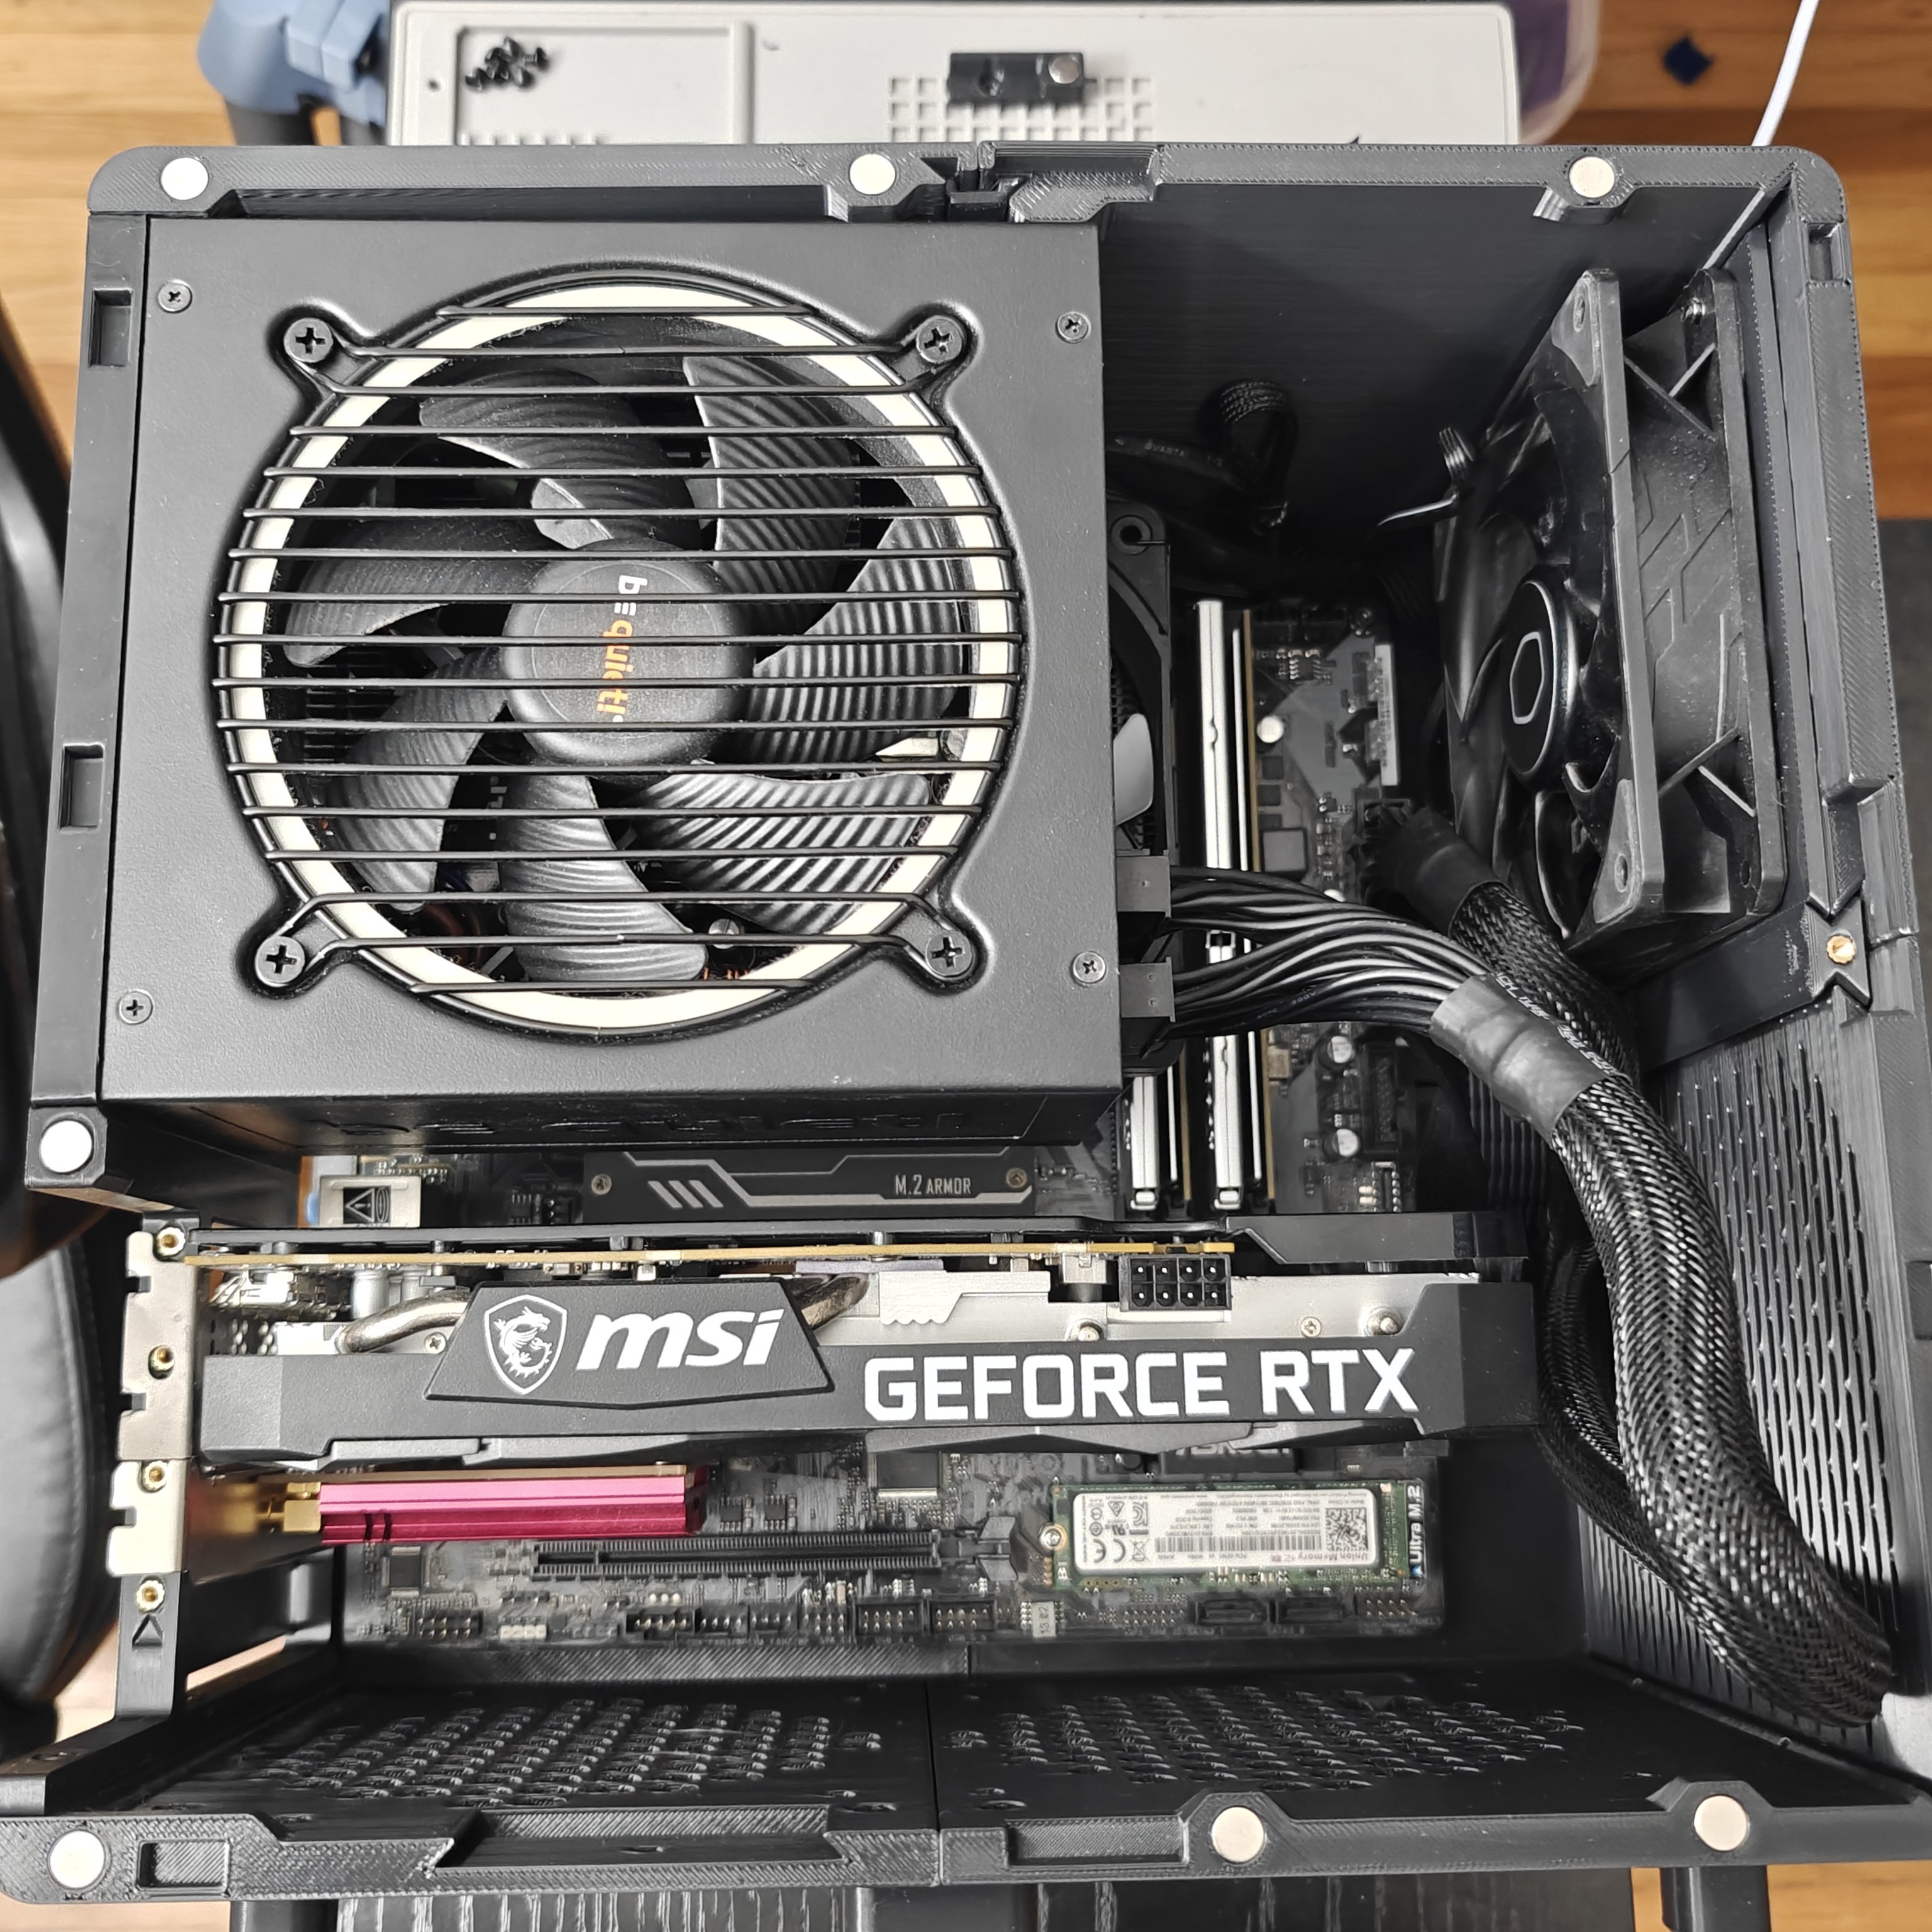
Now it gets real. The RTX 3060 slides in horizontally, which in this vertical case means it sticks out the side. The ATX PSU mounts above it. The 24-pin and 8-pin CPU cables are already fighting for room.
The GPU power connectors live in a tight gap between the card shroud and the PSU housing. Stiff braided cables would’ve been a nightmare. Flat flexible cables are basically required here.
SSD and Cable Routing
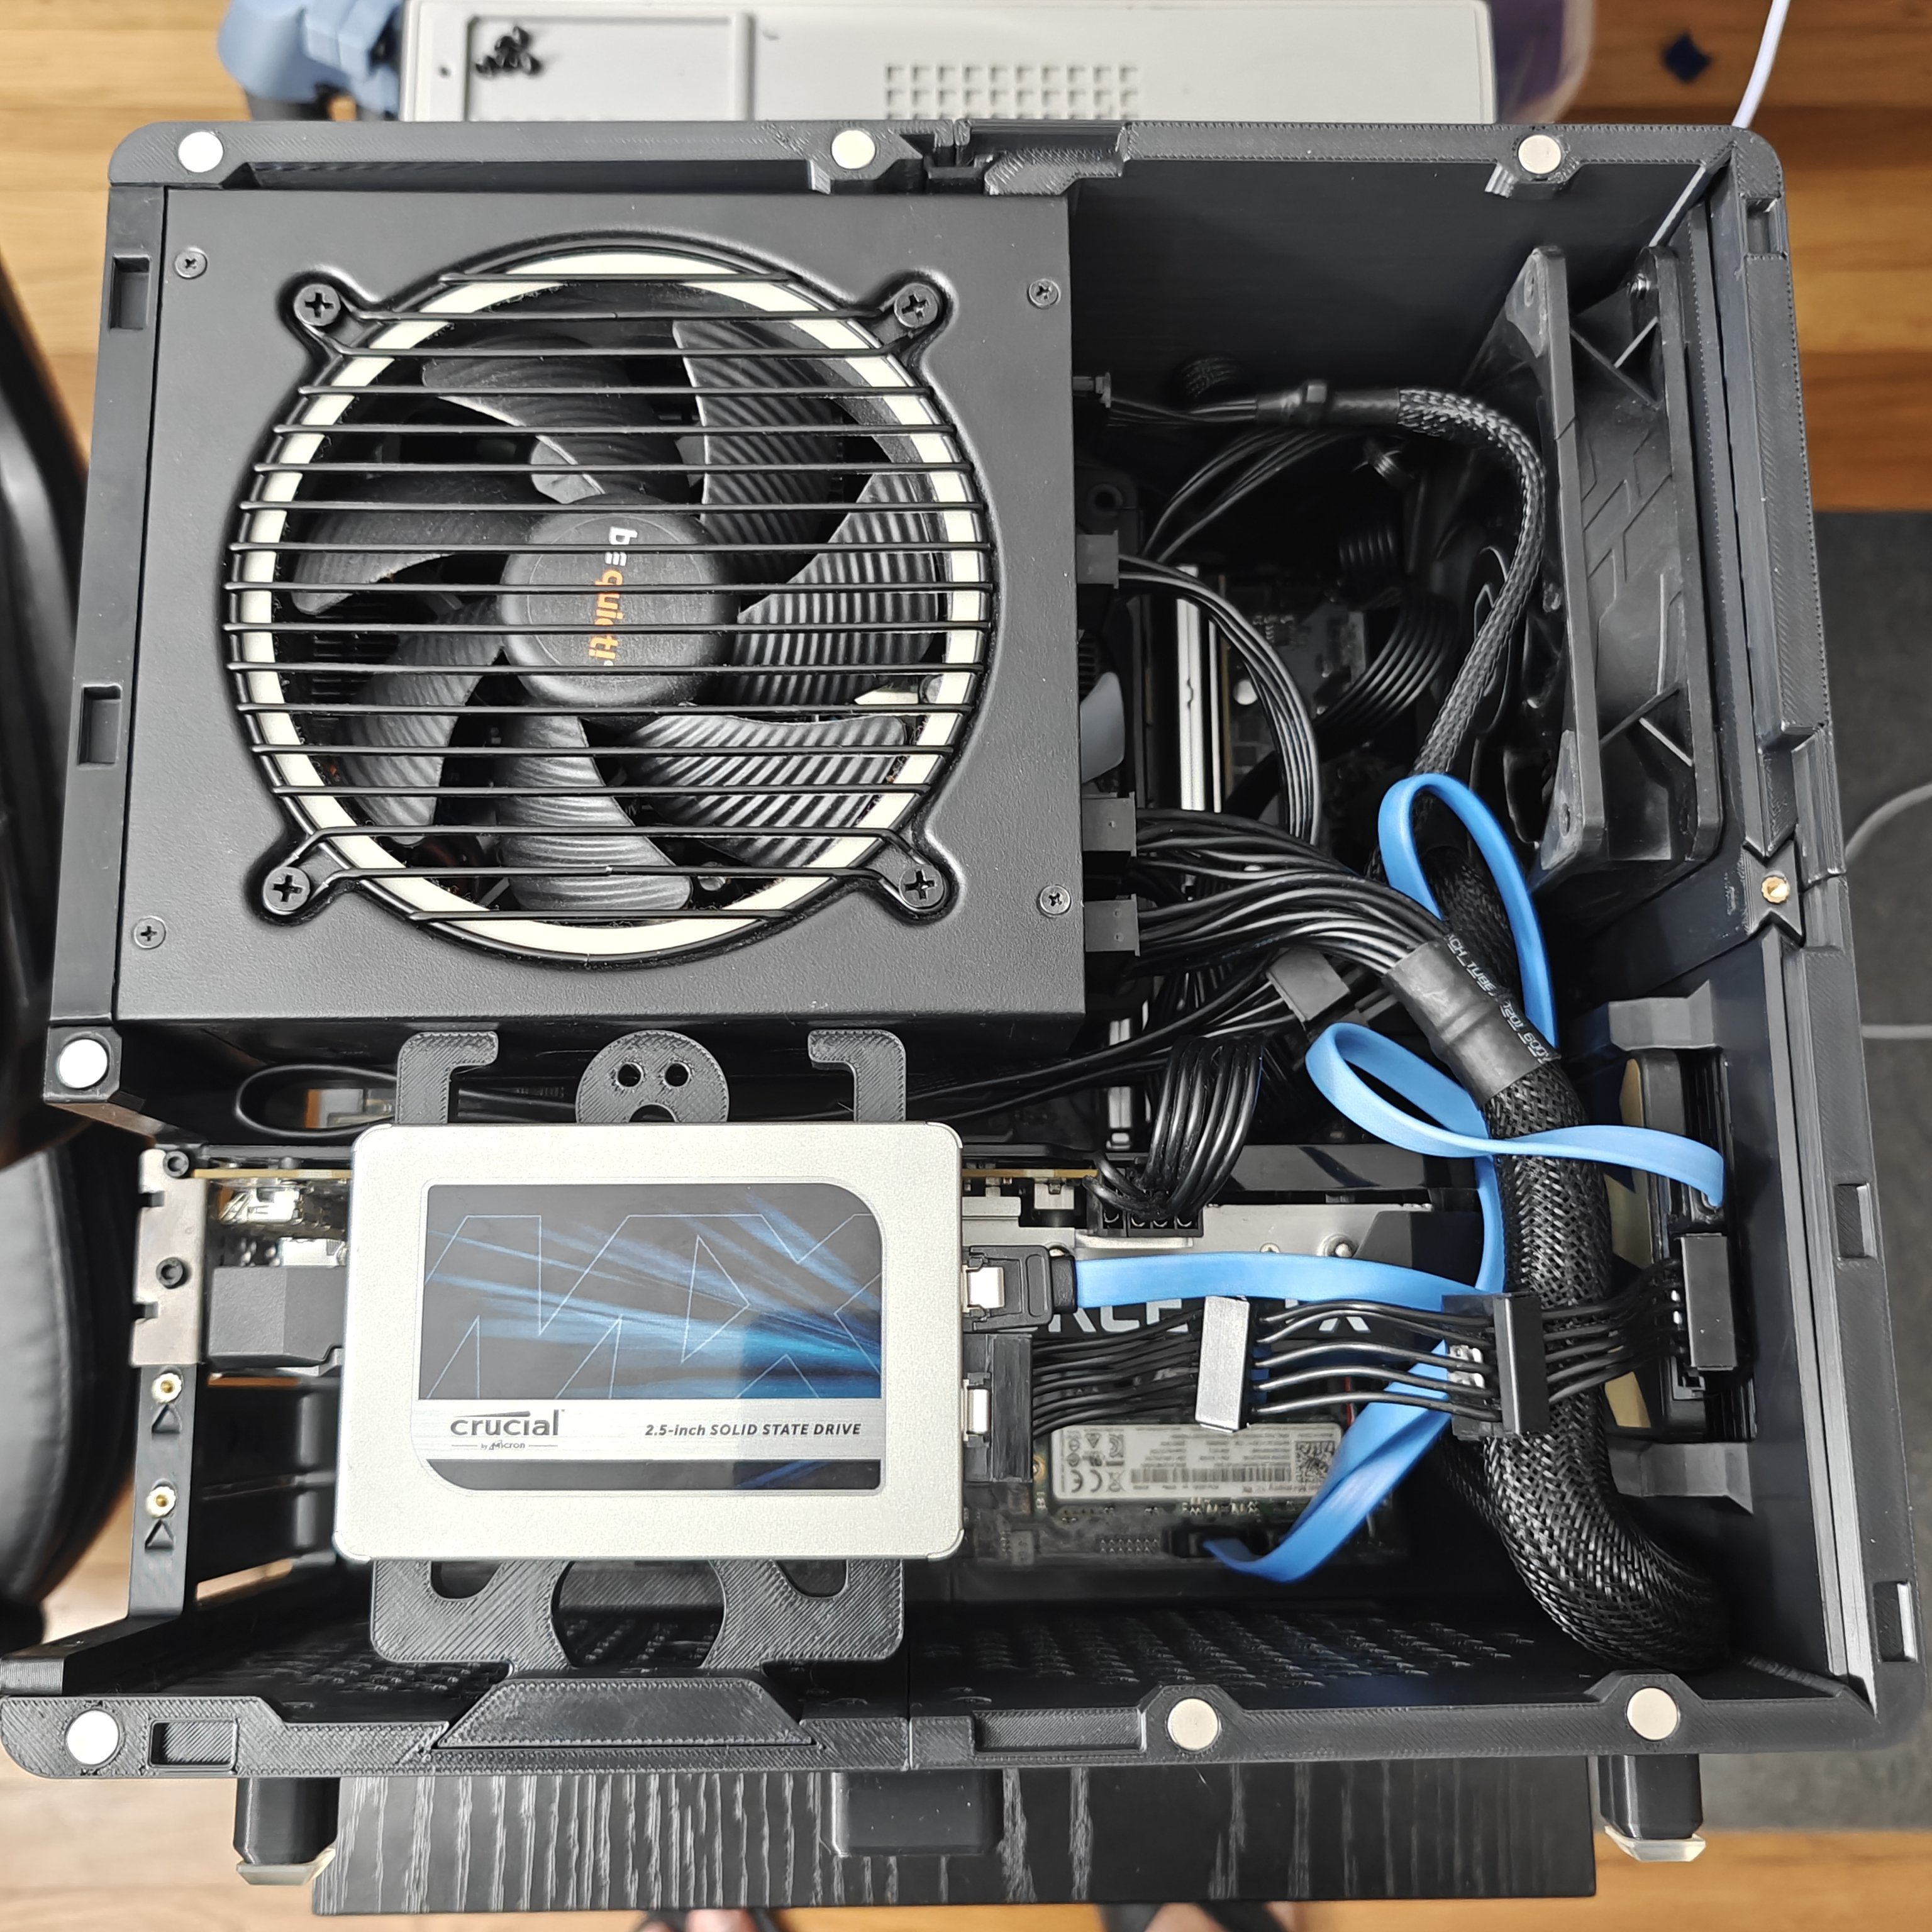
The MX500 mounts to a printed bracket on the front panel, right in front of the GPU. SATA power and data loop around the side and join the bundle of wires that are all trying to fit in a space roughly the size of a deck of cards.
Makerunit absolutely knew what they were doing with this design. Every bracket and cutout is accounted for. There’s not much spare room, but there’s enough, and in a case this small that’s basically luxury.
The Panels
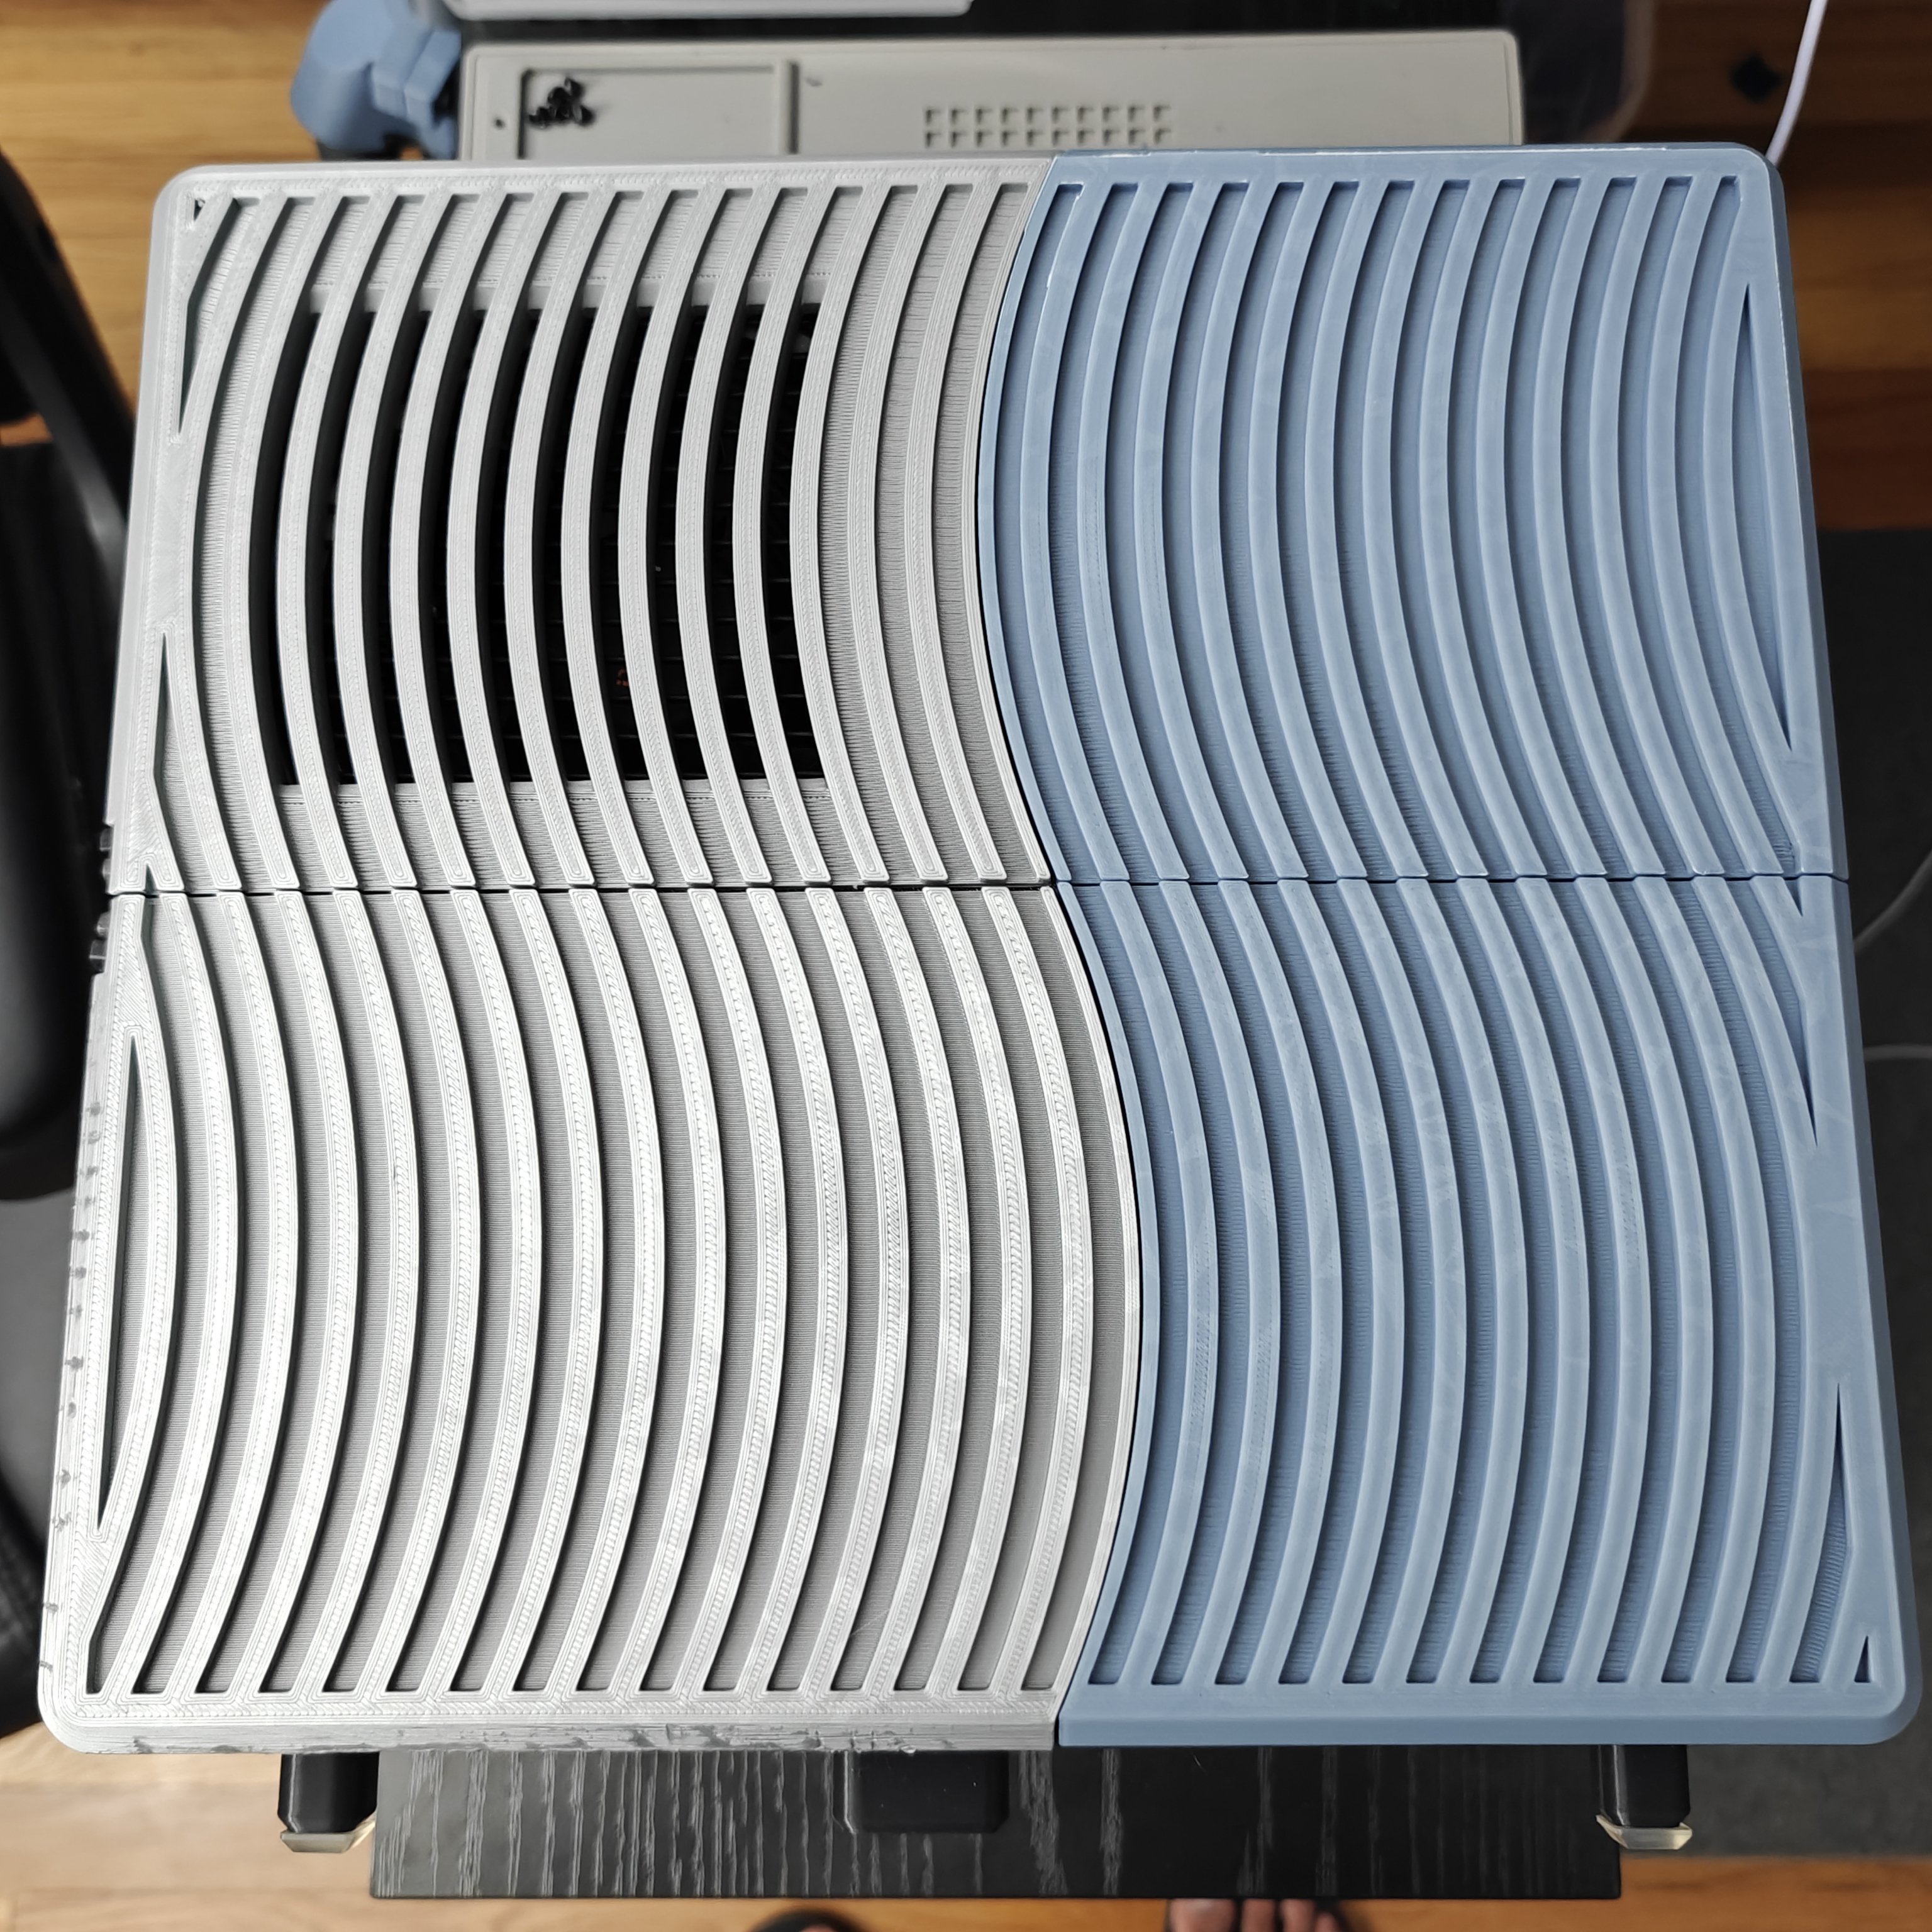
Before everything gets closed up, the side panels. They’ve got that curved wave pattern that works as both structural ribbing and airflow channels. The color split happened because I ran out of gray filament mid-print and decided to commit to it instead of starting over. The layers came out clean and the curves are smooth.
Back View
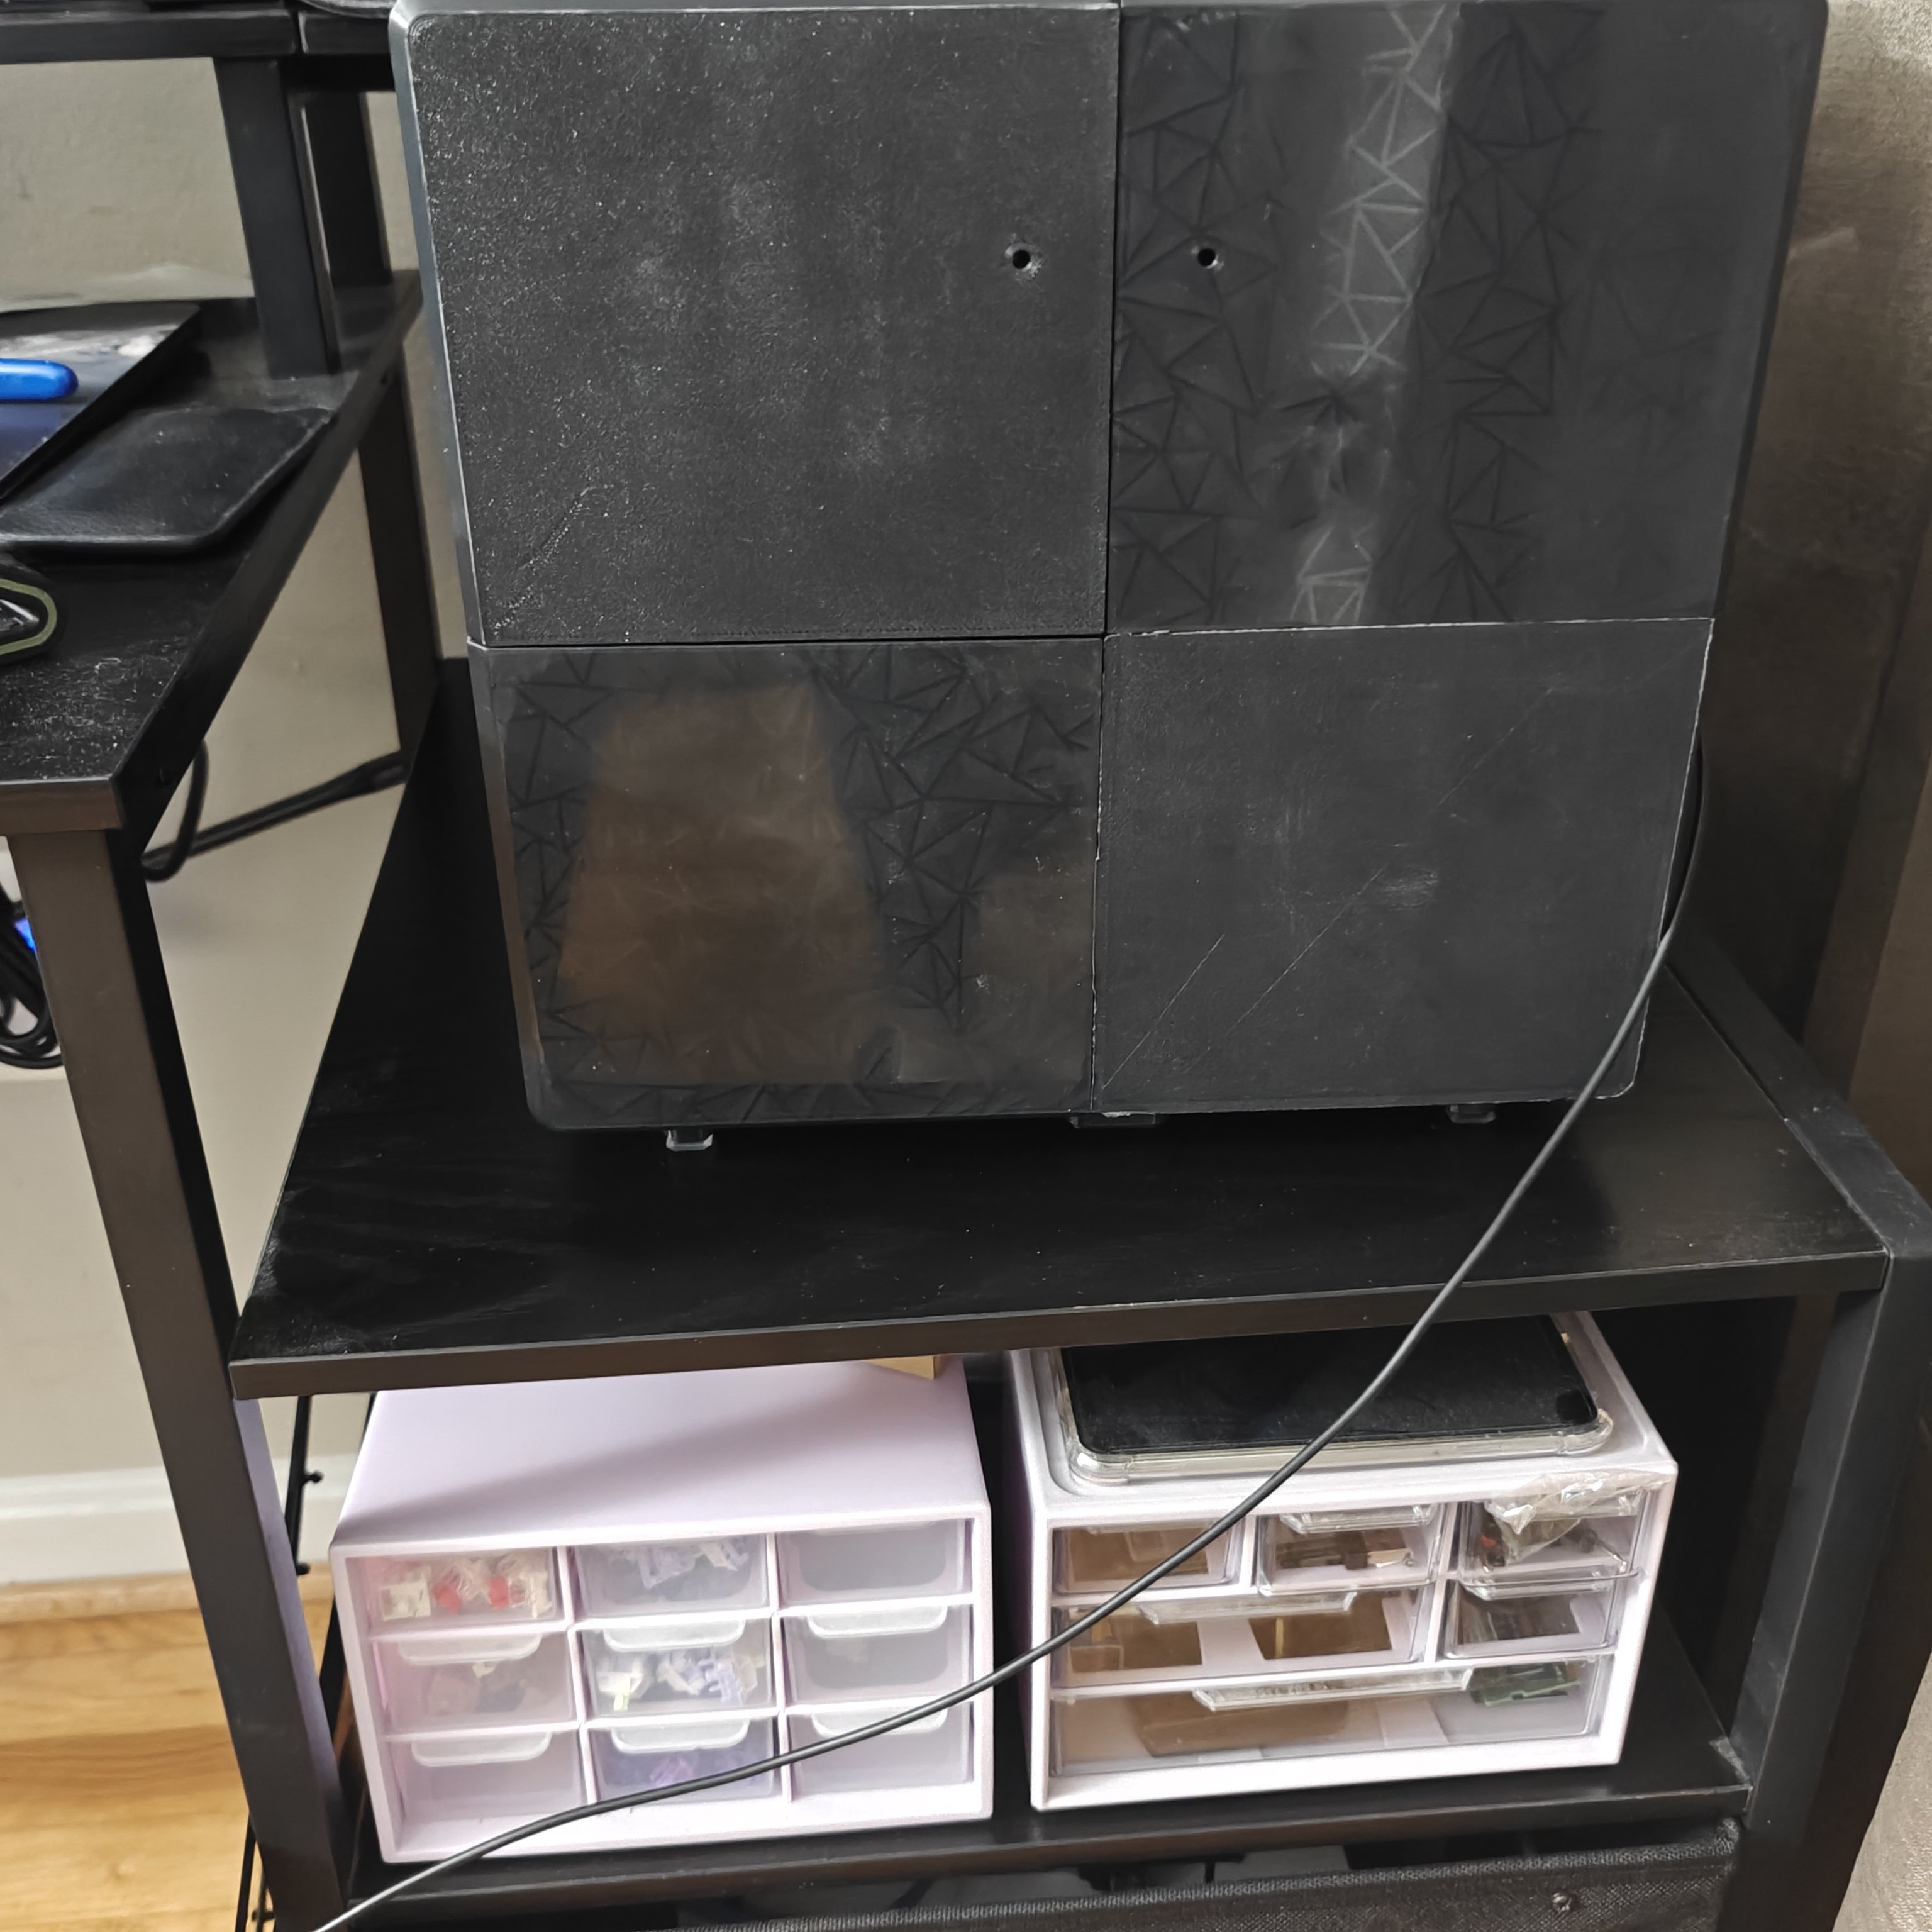
The back panel has a geometric star pattern printed in dark translucent filament. It hides cable mess while letting some LED glow through. The case sits on small printed feet just high enough for bottom intake. Power cable exits from the top rear.
Scale Check
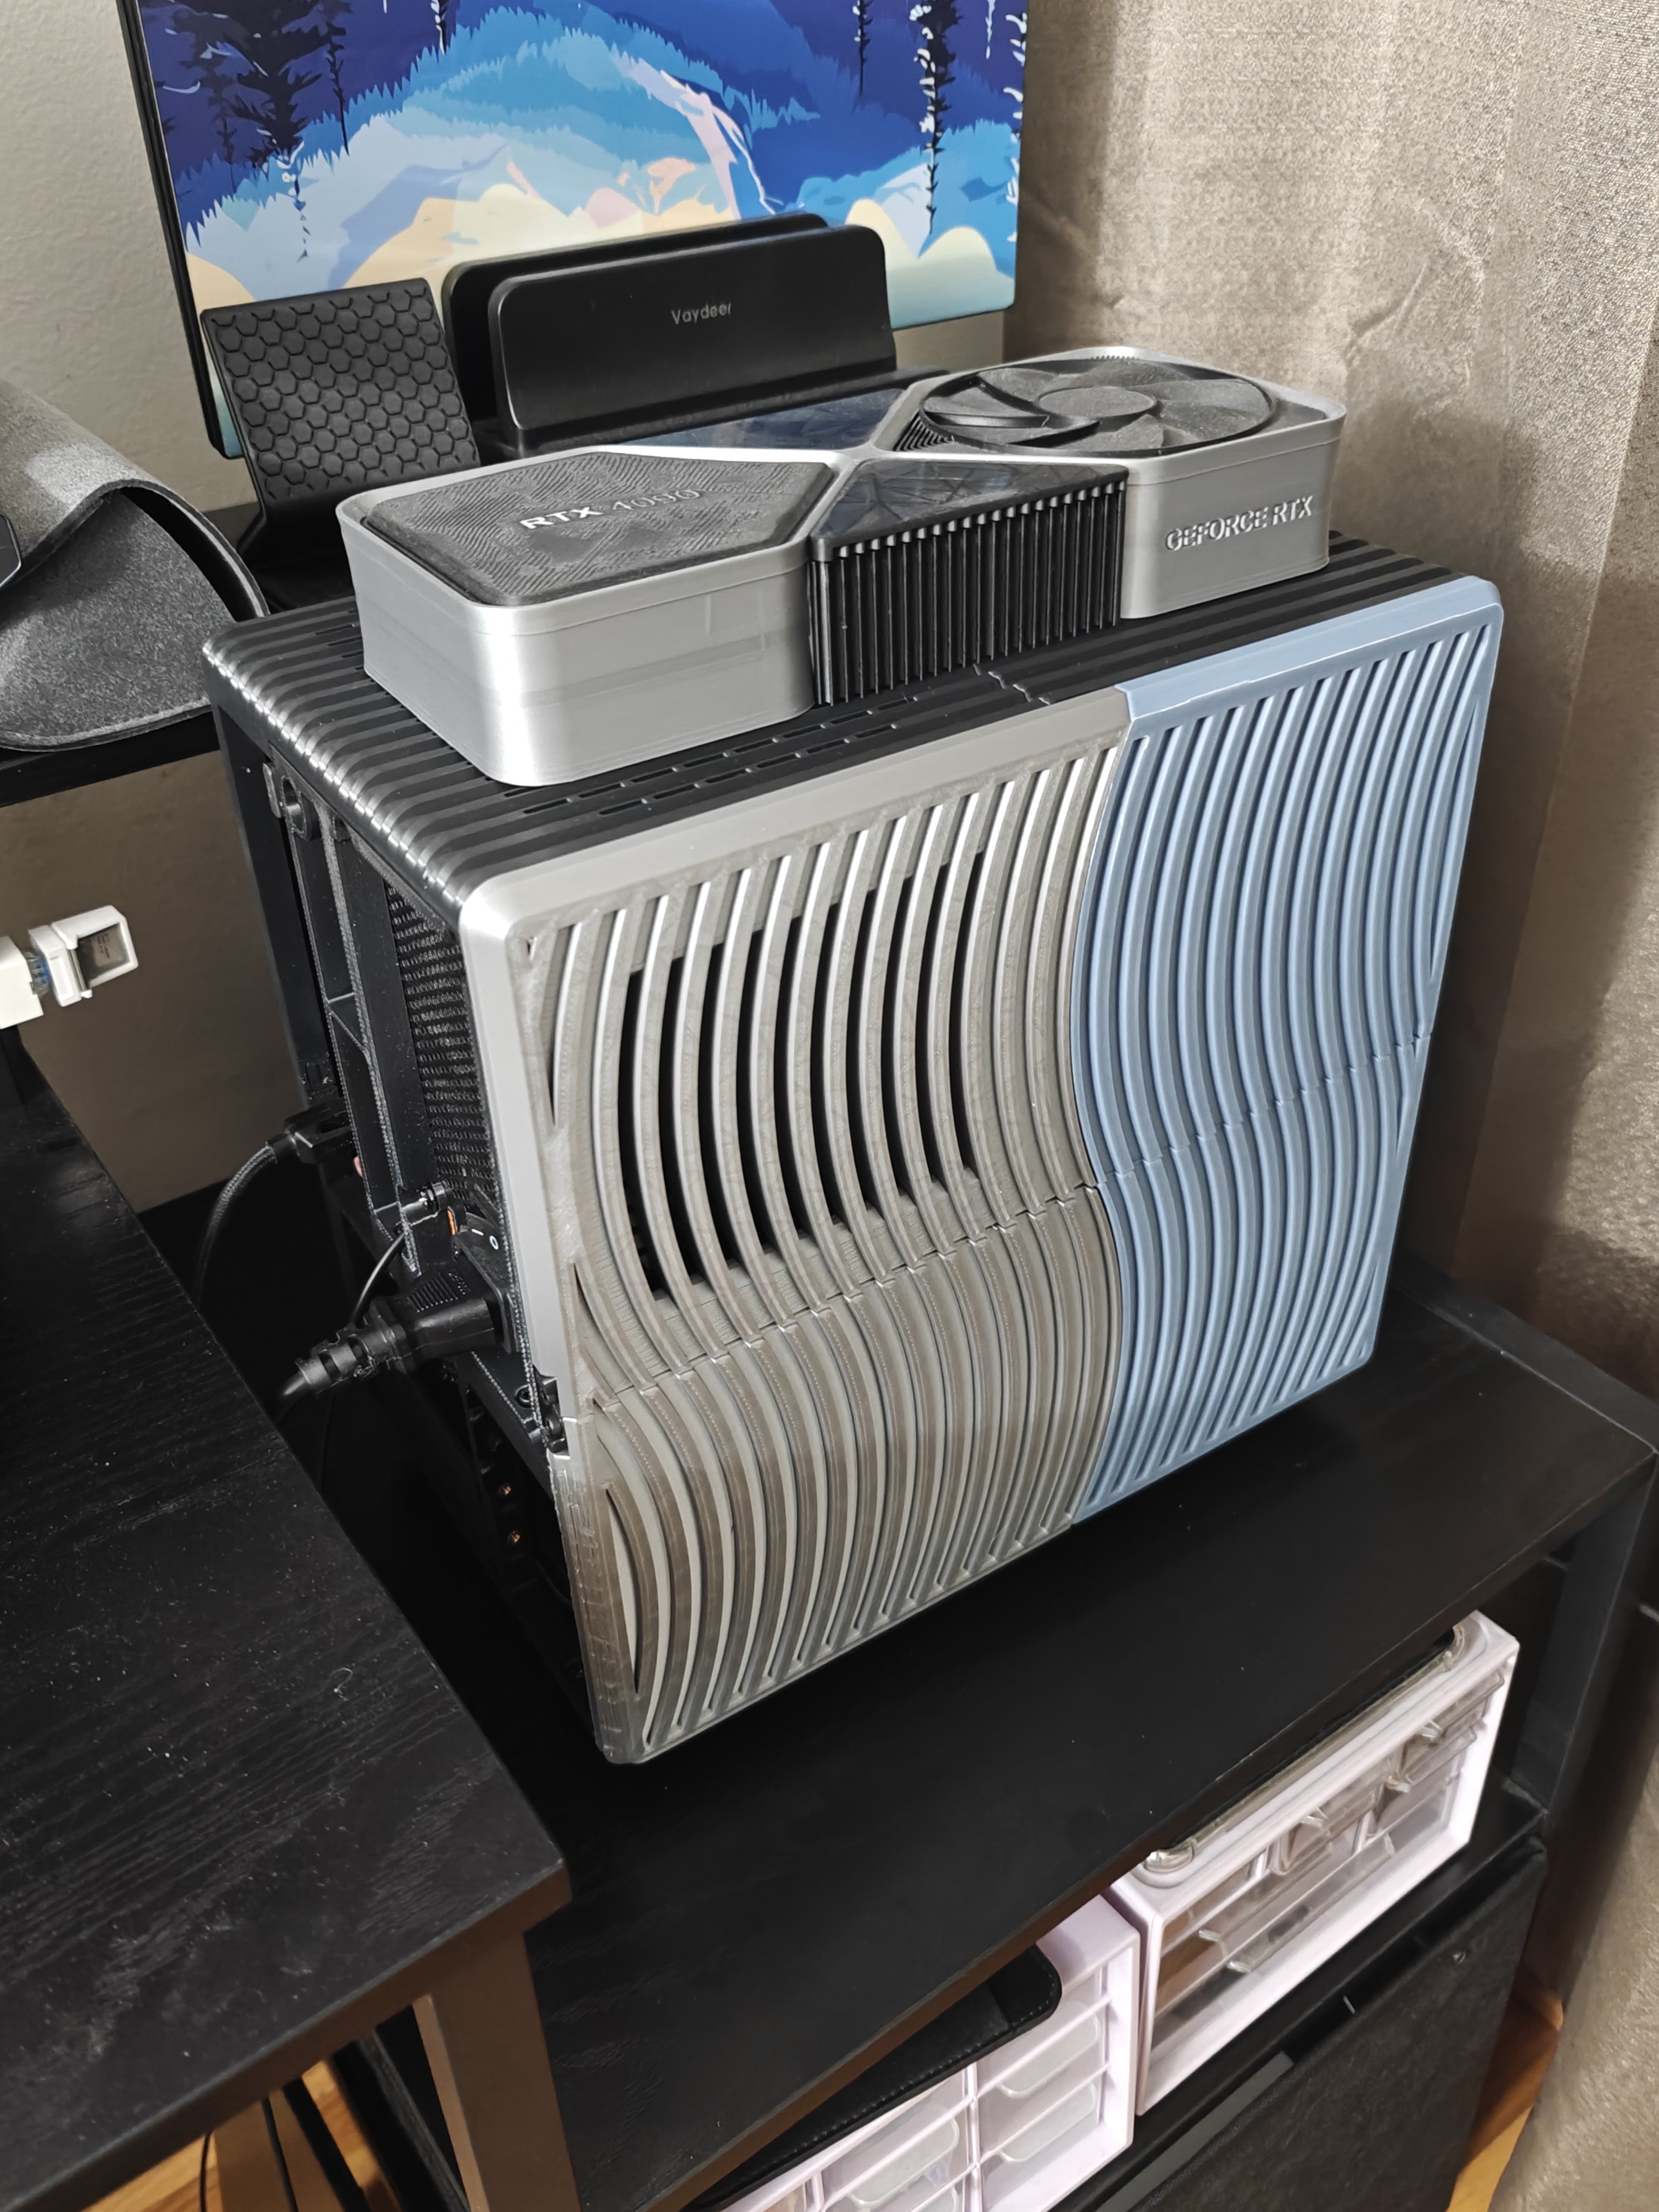
This is the photo that makes the whole thing worth it. The fully assembled case with the RTX 4090 pencil case sitting on top like a hat. The 4090 pencil case is literally bigger than the entire computer. That’s not camera trickery. The case is just that small.
What Changed
The obvious one is that it went from a floor PC to a desk PC. It actually fits on top of the desk now without looking like a piece of furniture.
The downside is that the constrained space means the fans have to work harder. They’re noticeably louder than before, and throttling is more likely on paper. That said, I havent actually felt any throttling happen in real use. Temperatures stay in a perfectly fine range. The vertical chimney layout does more work than you’d expect.
The Honest Verdict
Pros:
- Absurdly compact. Micro-ATX plus ATX PSU in a footprint smaller than most ITX builds.
- Thermally fine. The chimney airflow works better than you’d think.
- Cheap. Filament cost is nothing compared to buying a case.
- Reprintable. Break a panel? Print another.
Cons:
- Cable management is visible. There’s no behind-the-motherboard routing. Every wire is out in the open.
- No dust filtering. The open slat design means you’ll be cleaning it.
- GPU length limit. Anything longer than the RTX 3060 isnt going to fit.
- Print time. Expect a solid chunk of hours depending on your speeds.
- Fans are louder now. Tighter space means more fan noise.
Repairability: 8/10
- Fully tool accessible with M3 screws
- Nothing proprietary
- Break a panel? Print another
- Deductions for tight cable access and needing to pull the PSU to reach some headers
What I Learned
- ATX PSUs in small spaces are totally doable if you mount them vertically.
- PETG is the right call for structure. Rigid enough, forgiving enough.
- Flat cables arent optional in cases this dense. They’re survival equipment.
- Most full-size desktops are like 70% empty air.
- The 3D printing community on Printables is doing genuinely impressive work. Makerunit handled tolerances better than some commercial cases I’ve used.
Next Steps
- Print case panels
- Transplant all components
- Verify it doesnt overheat
- Take a photo with a 4090 on top for scale
- Maybe design a custom fan duct for directed CPU airflow
- Try a dual-tone PETG and TPU flexible panel variant at some point
Final Word
This build proves that “desktop PC” doesnt have to mean “takes up the entire desk.” You can fit a genuinely capable system into a volume smaller than a shoebox if you’re willing to deal with visible cables and a bit more fan noise. The tradeoffs are worth it for the footprint you get back.
Build Difficulty: Medium (planning matters more than skill) Cost: Great (filament is cheap, your time is not) Thermal Performance: Fine for what it is Smugness Factor: Off the charts when you put a 4090 on top
Final Verdict: 5/5. A good reminder that the 3D printing community can build things that rival commercial stuff when given enough CAD patience and PETG spools.


